Continuing my journey to learn more about microcontrollers, I’ve decided to test some new components with my Pi Pico.
A clock on a bigger OLED screen seemed to be a good option. Also, it will probably be integrated to temperature and humidity sensors later to monitor my new baby boy’s room.
This was an interesting experience as both OLED and RTC vendors claim to have “ready-to-use” open source libraries. The ones I’ve found were for Arduino (or Raspberry Pi) and didn’t work with my Pi Pico. It forced me to stretch my MicroPython programming skills and dive into the drivers world.
Real Time Clock module
The first question that I’ve asked myself was “Why do I need an RTC module if I could use the internal RTC?”.
Well… First, I found that we don’t have a MicroPython RTC implemented for Pi Pico yet. Second, date and time settings will disappear once you turn off Pi Pico.
For this solution, I’ve chosen the AZ-Delivery RTC DS3231 module.

It comes with built-in battery to keep tracking the time even when my Pi Pico is off.

OLED Display
I already used an OLED display in my previous post, but that was an easy implementation. That’s because the respective driver is included in the official Pi Pico MicroPython documentation.
For my new test I wanted a bigger display and check if I could reuse MicroPython libraries used by other microcontrollers.
I had a good experience with the WaveShare 0.91inch 128×32 OLED display in my previous article, so I’ve decided to go for it’s bigger brother WaveShare 1.5inch 128×128 OLED display.

Requirements
These are items used for this example:
- Pi-Pico (of course!) – you can buy a pre-soldered version, otherwise (like myself) you will need to solder the pins yourself.
- MicroUSB cable – make sure it’s a proper cable for data transfer, otherwise your computer will not communicate with Pi Pico board.
- Breadboard – a half sized breadboard (400 points) is what I’ve used here.
- Cables/Wire Jumpers – cables are a good start, but wire jumpers keep your breadboard tidy.
- Thonny installed on your computer (https://thonny.org/). Version 3.3.3 or later required to support Pi Pico.
- OLED display – I’ve used the WaveShare 1.5inch 128×128 SDD1327 model.
- RTC Module – I’ve used the DS3231.
You need to install MicroPython to use the codebase from this article. Please check my previous post (Pi Pico Quickstart Guide with MicroPython) for instructions to install MicroPython on your Pi Pico board.
Note for WaveShare OLED Users
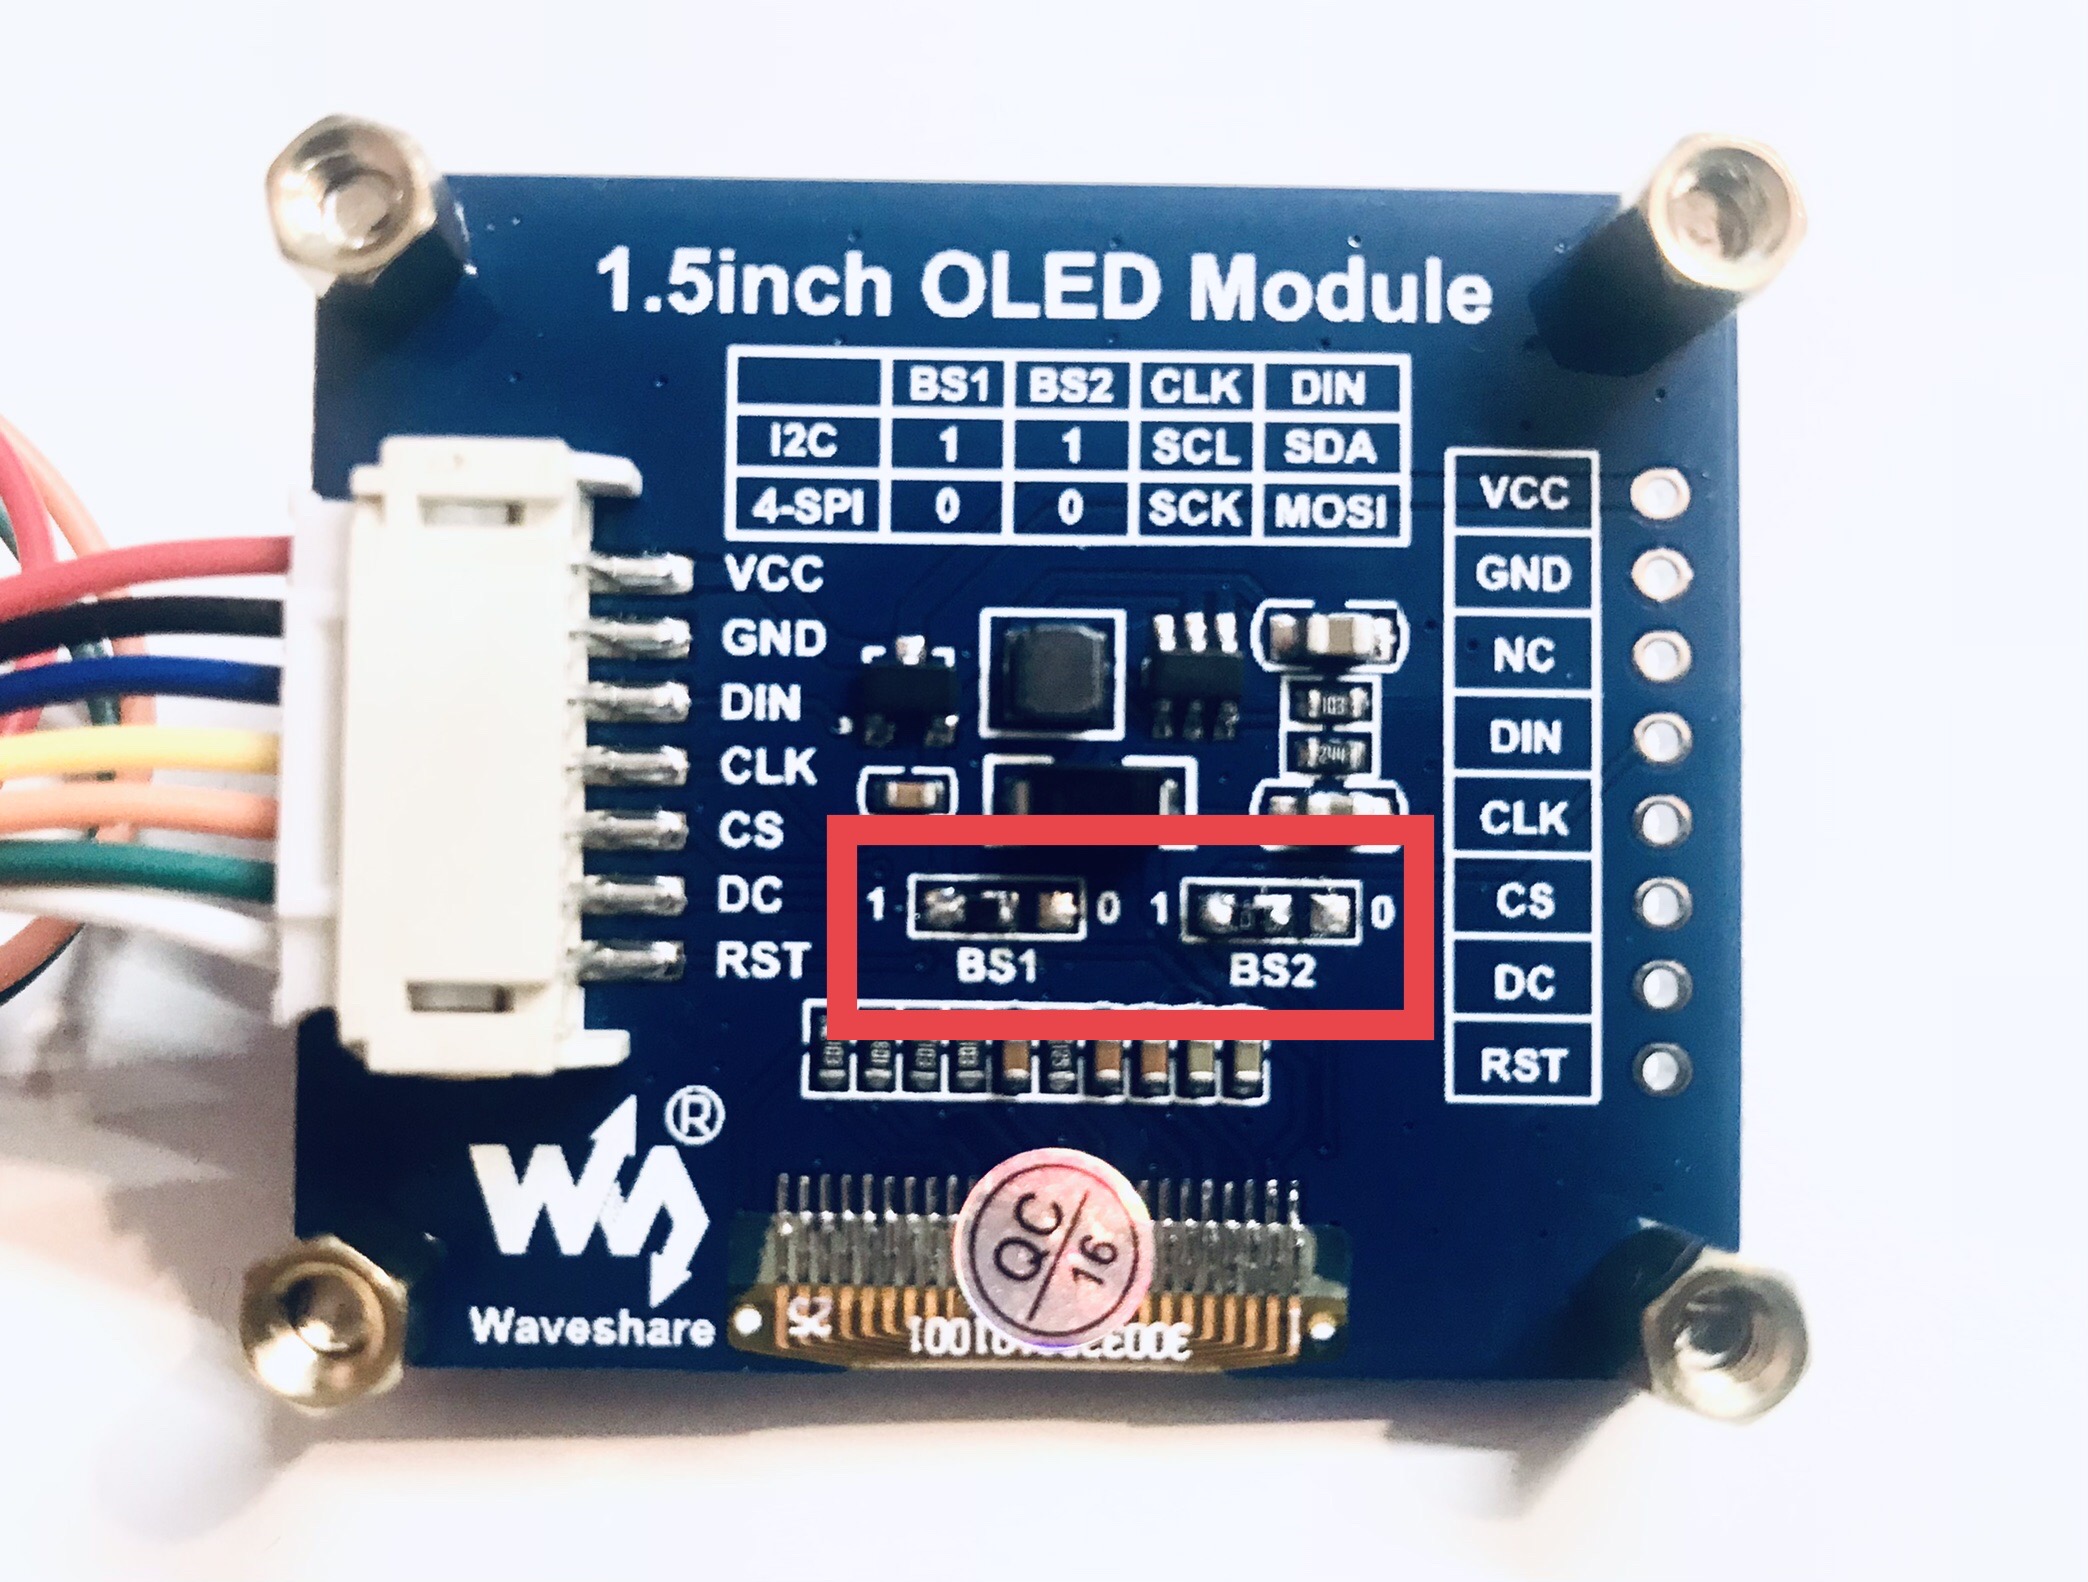
WaveShare OLED module comes from factory in SIP communication mode. You will need a soldering kit to change this configuration.
The picture below shows the BS1 and BS2 welding resistors that I had to change from 0 to 1 (as described in the table on the top of the board).

Wiring Information
If you are not familiar with the Pi Pico pins, please check my previous post (Pi Pico Quickstart Guide with Micropython) where I give a quick overview about this subject.
The wiring diagram below shows how we are going to connect the components for this example.

Drivers for Pi Pico
Most of the MicroPython drivers I found were designed for/tested with other microcontrollers and didn’t work with my Pi Pico.
After some (actually… a lot!) debugging exercises, I finally got a working solution. This is the approach I’ve used for the respective components:
- AZ-Delivery RTC DS3231 I2C – I ended up building my own (very) light driver with basic functionalities.
- WaveShare OLED 1.5inch 128×128 – I’ve extended the micropython-ssd1327 library from PyPi.org to support Pi Pico and WaveShare’s display offset configuration.
I included the drivers in the application repository. Although, If you are only interested in the drivers, please follow the respective links below.
This is the light version of DS3231 version using I2C:
And this is my forked repository from the micropython-ssd1327 package:
https://github.com/rodrigocmn/micropython-ssd1327
Quick update:
I sent a pull request to the original repository, so I believe that changes will be merged soon.
The Pi Pico OLED Clock application
The clock application is very simple as the main challenge was to make my Pi Pico talk to the other components.
I’ve been building some other examples for Pi Pico with MicroPython. There is a repository where I group all of them:
https://github.com/rodrigocmn/pi-pico-examples.git
You can clone the entire repo if you want to look around, but I would suggest downloading the clock application only.
Use the commands below to retrieve the clock application folder from my repository.
mkdir pi-pico-examples
cd pi-pico-examples
git init
git remote add origin https://github.com/rodrigocmn/pi-pico-examples.git
git sparse-checkout init
git sparse-checkout set pi-pico-oled-rtc
git pull origin main
cd pi-pico-oled-rtc
Once finished downloading the files, open Thonny and locate the downloaded folder in the file explorer. Then right-click on the main.py file and select “Upload to /”.
Repeat the same action for the “lib” folder.
Now you should see all files in your Raspberry Pi Pico.
Run the application by pressing F5 or clicking on the green play button. If everything goes well, you will see something similar to my final product below.


 OpenStack Single-Node (MicroStack)